Tag Archives: house to home

the baby’s room

A few year’s back I saw this blog post on a baby girl’s room and I loved it. The room is cheerful and bright for a child, but also fits in with the rest of their home. It was a room I would love to spend time in, not just tolerate for the kid. When I first started thinking about the martian’s room I knew I wanted it to have a similar look and feel. I’ve said it before and I totally own it – I’m an executioner, not a strategist.

In late summer Greg and I went to a Neil deGrasse Tyson lecture here in Seattle. It was hands down the best lecture I’ve ever heard – I would go sit through the exact same one right now just to hear it again. During the Q&A, a woman asked him something along the lines of how he defines success and his reply stuck with me. He said he measures his days as successful if he’s learned something new and if he has done something to make someone else’s day better.

In my head that translated to be kind and be curious. And that is exactly what I hope for for our kids. First and foremost, be nice people. I’ve been the nice girl tormented by the mean girls and, sad to say, for a brief period in junior high, I was on the flip side of that coin. Being kind is way, way better. And curiosity. I don’t care what he (or she) is into and I look forward to watching it change over the years, but I hope he looks at the world like it’s full of possibilities waiting to be found.

All that to say, those were my two influences on decorating this little room in our house. I should also add that I had the goal of buying as few baby only pieces of furniture as possible with the hope that most things can be repurposed once we no longer need a nursery. IMG_8852_edited-1Here’s the room from the hallway. We don’t have yellow hall walls, I’m just an amateur photographer trying to deal with a basement room on a half sunny winter Seattle day. Believe it or not, the walls in the hallway are the exact same color as the baby’s room. Time for a photography lighting class, perhaps?

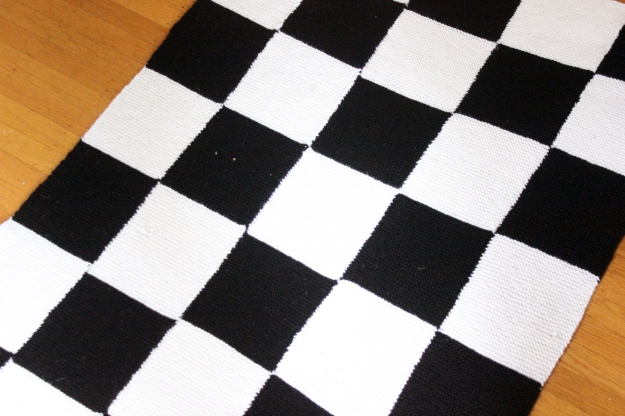
I am so excited to bring the black and white Crate and Barrel rug back into our home! I loved it in our office, but it wasn’t realistic with how often shoes and muddy doodle feet walked on it. Down in the baby’s room, though? Totally will work. I even went with the 5×8 instead of the 4×6. More stripes is always a good thing.

IMG_8868_edited-1The right side of the room. I used the throw pillow (formerly of our couch, but displaced when we got a new rug in the office) to pick colors for the room. I figured I like the pillow, so as long as everything I put in the room matched it, I would like it too. The side table will be perfect for collecting stuff as I nurse and then can easily move into other areas of our home in a few years. I loved the whimsical look of the lamp. We’re still trying to find the best positioning for it to be accessible but not shine directly in our face. The striped basket is full of swaddle blankets and burp cloths, two things I’m told we can’t have enough of.

IMG_8871_edited-1

This pillow makes me happier than a throw pillow should. But it just screams cheerful.

IMG_8855_edited-1

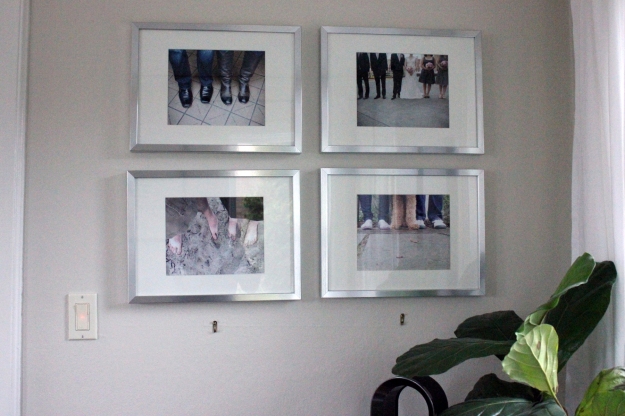
I love these digital prints I found on Etsy and printed on our home printer. The “Adventure Awaits” was a no brainer given my OLW this year. The shop was having a two for one deal on digital prints and I had two large frames. I picked up the bear to add a little California love to the room. Lauren pointed out it also adds a little UCLA love, too. We’ll start early with proper loyalties.

IMG_8854_edited-1

I was going to try to paint “be kind” and “be curious” script art myself, but then I found that Kal Barteski had this print that wouldn’t involve any doomed-from-the-start DIY. Sold. Combined with the two other sentiments, this wall is my favorite. I think it speaks just as much to me as to the baby.

IMG_8865_edited-1

And there’s the crib. I wanted a non-toxic crib and there are two options, really. Spend $800+ on something fancy or go to IKEA and get the wood one (no paint, no varnish, no glue) for $70. Sold. I love that it’s so plain and simple it doesn’t become the focal point of the room. Greg did his fatherly duty and put it together, documenting the process here. The baby will be sleeping in a pack n’ play we borrowed from friends in our room for some amount of time post-birth and will eventually move into the crib. That could be on the second night s/he’s here or in 18 months. I’m trying not to control things that I have no experience with yet.

IMG_8859_edited-1Then we get to the fun stuff. The bookshelf had been in our garage for a few years but wasn’t a necessity (more like a place to collect junk) so we cleaned it off and brought it back in the house. The top bin holds all the stuffed animals that we’ve been gifted. After finding a stuffed bear a little damp and laying in the hallway one day, I realized we’re going to have to do some training with Alfred. All the toys in the house are no longer his. So for now they are tucked away out of view. Thanks to friends and family, we have a great little library collection going. The building blocks have the elements from the periodic table on them, a Christmas gift to baby from Greg. He sadly couldn’t find the flow chart baby blocks that we came across online in stock anywhere. #nerdbaby

Untitled-1
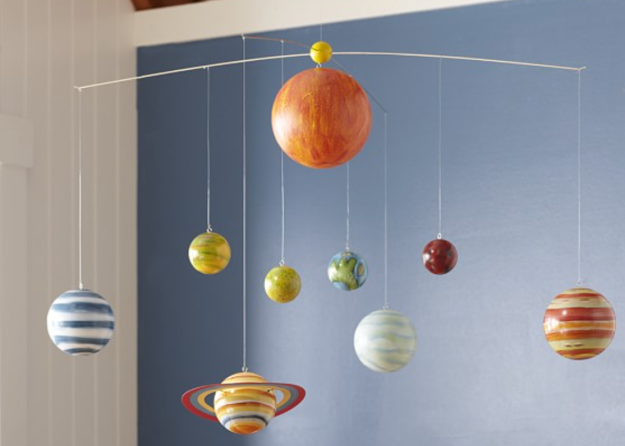
One of my first purchases for the baby was the globe. I get that the kid is not going to understand it for years, but I still like the idea of him (or her) loving Seattle but realizing there is a whole big world out there. The little giraffe is made by women who work for the Kenyan organization that one of my good friends is the US director for. I became obsessed with finding old school wooden toys for the baby. I love how they look and that they are simple. (The bottom right basket in the shelf is full of hand-me-down regular newborn and baby toys, which I’m sure the baby will love way more than my Esty finds.) The penguin is a gift from my good friend in San Francisco; it’s so adorable it finally got me excited about buying baby stuff when I received it.

IMG_8862_edited-1
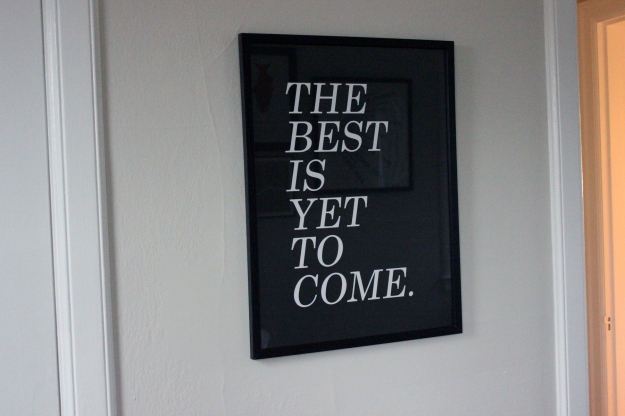
And lastly we have the dresser / changing table area. We are cloth diapering so the top drawer is full of diapers; I have newborn clothes in the second drawer and 0-3 month in the third. Future sizes are all stored away in the closet (door on right) to be pulled out when needed. I don’t love the decor above the dresser but I’m feeling done so for now it’s staying. The map is of the US and its meant to be cross-stitched as you visit different states. We’ll see if that happens someday. We already have plans for at least three but probably four states this year (if the first trip isn’t an epic disaster), so maybe I will be motivated to update it every few months. Once the baby is named I might do something with it’s name above here as well.

We will be using disposable diapers for the first few weeks and they are stored in the little turqouise IKEA cart. (I’m obsessed with these carts and own one in each of the three colors they currently produce.) We also have disposable and reusable wipes with the diapers, and once I get around to making them, the other baby cleaning products will be stored on top as well. Nursing supplies are on the second shelf and baby health care items on the bottom. We have a second cart in cream upstairs that has diapers, wipes, nursing supplies, burp clothes, and blankets. I’ve heard from several people that we will be very thankful to have a baby station on both floors.

So that’s it. Room three of six in our home is decorated and I love it. The countdown is now to three weeks at the very longest before we can bring the little one home and put the room to use. Also, that means my countdown to sushi is three weeks. It’s the one pregnancy ‘rule’ I followed and I feel like I should see it through now that I’m so close.

The Goods

As usual, I waited for everything to go on sale (minus IKEA and Amazon) and use eBates whenever I can for the automatic rebate.

rug // crib // sheet // striped blanket // paper poufs // rocker // foot stool pouf // lamp // side table // ‘adventure awaits’ print // bear print // large frames // ‘be’ print // ‘you are so loved’ print  (no longer available) // ‘see the world’ print // white frames // striped basket // curtains // bookshelf (similar) // large baskets (container store) // globe // california toy // rainbow wooden stacker // wooden toys // periodic table blocks // cart // dresser // changing pad // US stitch map (Happy Mail by A Beautiful Mess – no longer available)

Amazon links are affiliate links.

tissue poufs

IMG_8827_edited-1

My original plan for the crib corner of Martian’s room was to hang this adorable (and oh-so-nerdy) solar system mobile from Pottery Barn. I will explain this next week when I share pictures of the baby’s room, but the room was inspired by Neil deGrasse Tyson and the Enjoy It blog by Elise Cripe. Yes, that’s weird and I’m willing to guess it’s the only nursery ever to be inspired by these two people, but stick with me. It’s adorable.Screen Shot 2015-01-29 at 9.00.45 AM

When we unpacked the mobile to hang it the other night it was about 4 times as large as I had expected it to be from the photos. Greg was concerned about how heavy it was to be hanging over the crib. Then we found the tag that said “do not hang over crib”. We tried various locations in the room but given our short ceilings (our bedrooms are in the basement) and the smaller size of the room, it just wasn’t going to work.

So on to plan B and a new craft project for me. I wanted something colorful, on the cheap side, and easy and quick enough for a nine-month preggo to do in short order now that we’re in “any day now” territory. I honestly don’t love the idea of mobiles to begin with, it was more the solar system that had me captivated so I switched gears to tissue paper poufs. I had previously seen them on Elise’s blog in her little girl’s room and Lauren recently added the poufs from Sloane’s first birthday to her room décor. It seemed like the thing to do.

IMG_8812_edited-1

I searched Etsy to find pre-made poufs but wasn’t able to find a single source that had the selection of colors and sizes I wanted. I ended up taking the suggestion from Elise’s post on making her poufs and buying tissue paper to make my own. I found the colors I wanted at the store she recommended and was able to buy the amount of each that I wanted, which turned out to be at least double how much I actually needed. If you’re on my gift list, expect colorfully wrapped gifts for the next few years. I was impressed with how quickly I received my paper (two days!) but was a little annoyed that they only offered Priority Mail shipping, which was 50% of the total cost of the tissue paper itself.

IMG_8814_edited-1

This project, unlike most, was much easier than I expected. I followed Martha’s instructions and created 16 different sized poufs. For each one I used eight sheets of paper. The large are eight full sheets, the medium are eight with one quarter cut off, and the small are eight cut in half (also known as four). To add different textures, I trimmed some round, some pointy, and some I did not trim at all.

I have bought pre-made poufs before for parties and for whatever reason I think it took longer to “pouf” those (they come folded up) than it did to cut, fold, and pouf these myself. I had settled in for a long day of working on this and was pleasantly surprised that even with clean up I was done in less than two hours. It didn’t end up being as cheap as I’d hoped, but at the moment I’ll take quick wins over cheap wins (sorry Greg, I’m almost done spending money!).

IMG_8826_edited-1

It took me about an hour to arrange and hang (using fishing line and flat, white thumb tacks). I used just over half of what I made. I might add more, but for now I think it looks good without going overboard. Its so hard to take good photos with the light we have downstairs and these are a bit darker than they look in person.

Project: 13/35
Time: 3 hours (2 to make the poufs, 1 to arrange and hang)
Tutorial: good ol’ Martha Stewart
Cost: $50 ($40 for paper ($17 in shipping!) and $10 for fishing line, thumb tacks, and floral wire)

yet another blanket

It’s clear I have an obsession with making blankets. I really like to curl up in them and am assuming this is why they’ve become my favorite craft project.

IMG_8803_edited-1This is the first blanket I made for Martian. I’m excited it’s one of the few blankets that I’ve made that will stay at our house, as most of them have been gifts. I originally started with cream, gray, and olive. It’s so hard to pick gender neutral colors. Once I got started the olive didn’t feel right so I dropped it and went with just cream and gray. (My photos came out very gray and white, but it’s actually much more cream.)

IMG_8801_edited-1At some point while knitting the blanket I looked at the skein wrapper and realized it was hand wash only yarn. I had just picked the softest yarn I could find at JoAnne’s in colors that I liked. Whoops. Rookie mom mistake. I guess this will be more of a special occasion, photo blanket. I’ve already got a second knit blanket started in washable yarn.

IMG_8806_edited-1I’m still trying to improve proportions. The intended dimensions of this one were 32 x 39 and it turned out to be about 29 x 44. At least I managed to get the stripes going the direction I intended them to go! Here is my model helping to show off the size of the blanket.

IMG_8605_edited-1A few rows in, I realized I was going to have a mess of tails to knit in after I was done. Knitting all the tails in is my least favorite part of knitting by far and I hadn’t thought about how bad it would be by switching colors every two rows. The tails above are just from one gray and one cream stripe. I went in search of a better way and YouTube totally came through. I learned how to knit the tails in while you start the next color. It makes one side of the blanket ever so slightly more bulky, but it’s hard to tell. And very much worth the time savings. Love that I keep learning new techniques with each project.
IMG_8796_edited-1

I was hoping to share some photos of the baby’s room this week, but the awesome solar system mobile I ordered from Pottery Barn turned out to be huge and just didn’t work in the room. (Yes, we’re doing everything in our power to make sure this kid is a nerd.) I’ve moved on to plan B, but it will take a week or so for that to arrive and some time for me to put together and get hung up. Hopefully it will be ready before Martian makes his or her arrival, but I’m not stressing.

Instead a little peak of the blanket in the room, just waiting for it’s person to come home and snuggle. As we all are!

Project: 12/35 (I just turned 34 last Monday which means I have 12 months to complete 23 projects. Yeah.)
Time: 3 months of TV, plane, and road trip time
Tutorial: nothing for the knitting, but I used this video to learn how to knit in the ends as I went
Cost: $30 (six skeins of Paton’s Classic Wool Yarn, on sale for $4.99 each)

the kitchen

I’m excited to be sharing another done room in our home! I don’t really think of the kitchen as a space that needs a lot of decorating, but ours definitely needed some help. IMG_3312_edited-1

This is the best before picture I can find of the whole room, but please note that I was specifically taking a picture to show what a disaster I make of the kitchen before dinner parties. The kitchen does not typically look like this!

Our kitchen is fairly small and galley style. I love our house but I do dream about the day I have a more open concept kitchen. To focus on the positives, the upsides are the great windows at the far end, the awesome stove, and the glass door cupboards.

And to call out the less positive, eggplant. I took to thinking of the walls as eggplant because it sounds better than purple, but either way they were incredibly dark. The other problem was the original light fixture.  Greg was always bumping his head on it and it just seemed in the way. That thing weighed more than 50 pounds when we finally took it down. We never used the small table because we both disliked being over in that corner of the room. It felt really claustrophobic.

IMG_8703_edited-1

I can’t even tell you how happy I am with the after. The new paint color alone was enough to make me fall in love with the kitchen. We removed the window coverings as well and gained several additional inches of light. Even on a gloomy Seattle day it is much more bright than before. IMG_8694_edited-1

We now eat dinner at the table! Okay, so sometimes we still eat on the couch. But when we do eat at a table, it’s here at this little one in our cozy nook. I used to think I needed a new table in here but now we’re perfectly happy with this 6 year old set from IKEA. Why replace what works, right? IMG_8703_edited-2We sold the old lamp (for nearly the exact same price as the new one – love when that happens!) and replaced it with this beauty from West Elm. I love that it adds some warmth with the wood but is out of the way. 
IMG_8711_edited-1

And in the evening it makes fun shadow wall paper.
IMG_8695_edited-1

Back when this wall was eggplant it didn’t look quite as bare, but with the new lighter paint we needed to put something up. I picked a few prints from around the internet that made me smile when I thought about their sentiment. I think they all go well in a kitchen. IMG_8697_edited-1

We took down a white board that had previously been above the stove. It was nice to hang things on, but with my short arms it was a pain and it never looked all that clean so I decided to do away with it and have the painters patch up the wall. This area looked a little bare as well and up went a basic clock. Yes there’s a clock just to the left on the microwave, that didn’t stop me.
IMG_8699_edited-1To corral fruit and veggies, I used to use a trifle bowl. I don’t even actually know what a trifle is, so I had no real use for the bowl other than storage. Unfortunately that bowl held, at most, three sweet potatoes and an onion. It drove Greg insane that  fruit and veggies were constantly rolling around the counter. I have to admit I love this basket too. Marriage therapy, people. Available at your local Crate & Barrel for just $19.95.

So that’s our kitchen. I love it. Next up is finishing the nursery. Hopefully before Martian arrives, but if not, then after. The kid is not gonna have a clue. Then I’m taking a break. Outside of decorating, we completed a handful of other (expensive) home improvement projects this year. Over summer we had our attic insulated, which is making a huge difference this winter in comfort and hopefully the gas bill as well. In October we had the interior painted one light, neutral color and then in November we had new carpet installed downstairs. The house is looking great but none of these projects was cheap! Decorating the dining room, living room and our bedroom will wait until later in 2015.

The Goods

pendant lamp // table (similar) // chairs // yellow pitcher // ‘gather’ print (I requested a custom layout as the original was landscape) // ’embrace the mess’ print (this was a free printable from A Beautiful Mess but I can’t find a link to it on their site now) // ‘food rules’ print // frames (looks like the 11×14 version is currently out of stock) // ampersand clock // fruit basket

As with our office decorating, it took me a while to collect everything as I refuse to buy anything until it’s on sale or I get a coupon for a store. (Unless it’s Amazon or IKEA because sales and coupons don’t happen). I also use Ebates for everything I buy online, when available for a given store. I so wish West Elm would jump on the Ebates bandwagon. 

around the house: christmas edition

I’m not a big holiday decorator. I prefer a few things that make the house festive but I’m not into looking like my home recently birthed Christmas all over the place. It’s just too much clutter for my taste. I also try to only buy a few new things each year so that as my tastes change I don’t find myself having to buy a whole house worth of decorations at some point.

IMG_8570_edited-1I love coming home to Christmas lights on the house and seeing our tree in the front window.

2014treeSpeaking of the tree, it’s pretty basic but I love it. It’s our old fake tree with a few new additions this year. My sister-in-law pinned a tree with two sized lights and I loved how it looked. I picked up two strands of larger bulbs from Target and added them along with the normal sized ones that are pre-hung on the tree. All of our ornaments are from friends, family, our childhoods, or ones we’ve picked out together.

IMG_8467_edited-1

The red and white garland took me a few hours to make last month and helps to fill in some of the holes that come with a not quite top of the line fake tree. I followed the same process as for my fall garland, but the strips of felt were only about half the length, four inches or so. (FYI – it takes longer when the strips are shorter as they are more difficult to tie.) It’s 25′ long (!) and cost about me $1.50 (maybe $5 if you don’t already have twine and some felt to start with).

IMG_8580_edited-1
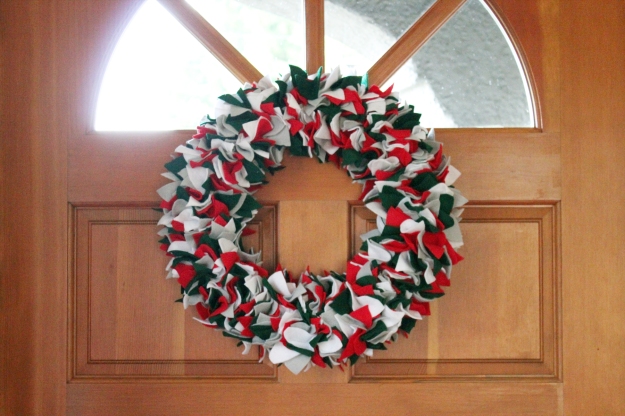
I had plans to make a second wreath this year, with a goal of eventually having four, one for each of the big windows in our living room. Let’s just say this was a Pinterest fail. After 90 minutes I had one good looking pom pom and three sad pom poms. And needed at least twenty more. Executive decision made.  Last year’s wreath looks lovely on the inside of our front door and 2014 won’t be the year of the second wreath. Moving on.

IMG_8567_edited-1

I wanted to do something simple on the dining room table that wouldn’t compete with the red in the living room. Loving the gold, white, wood and greenery. I really love how it looks with the candles lit in the evening. So warm and inviting. The table runner I made last year is on the kitchen table since that’s where we actually eat most of our meals these days.

Other than that, we have stockings, a bowl full of gold ornaments on an end table, a small “JOY” throw pillow, and an arrangement of holiday color glassy babies. Oh, and a brass reindeer from my late grandfather-in-law’s brass collection that I’m somewhat obsessed with. I am so excited that next year we’ll also have a little 10 month old to join in all the holiday decorating festivities around the house. Or at the very least to destroy them.

the office, part two

Back in early February, I shared our updated office. Little did I know there would be another overhaul before it was officially declared finished. It’s done now and we’re 1/6th of the way to a decorated house (two years after we moved in….).

The before: IMG_7828_edited-1

And the after:

IMG_8475_edited-1Originally the room was olive green, until last month when we had the house all painted one solid color (Burberry Beige, but I don’t recall the brand our painters used). I’m pretty much in love with the color. The best way I can describe it is a very warm greige.

With the upcoming new roommate we’re gaining, we’re losing our guest room. The couch in the office was several years old and had seen better days. We decided to replace it with a sofa bed. The office has a door and will make a decent guest room for the few times a year we have overnight guests. I collected the throw pillows at some point over the summer, once we determined Alfred no longer chews on anything other than his toys.

IMG_8478_edited-1

We originally had a cheap (literally $10) end table from IKEA next to the couch. I never thought much of it but apparently Greg hated it and finally came clean. I am not a mind reader, but I definitely can find a new end table if given the challenge. Next to the table is our gallery wall of feet. I love “from where I’m standing” photos and printed a handful out from our four years together.IMG_8477_edited-1

So far we have prints from our engagement and wedding photos in 2012, a trip to the east coast in 2013, and a family shot from New Year’s Day 2014. The two nails waiting for frames will be filled with photos from our maternity and newborn shoots early next year. Can’t wait to complete the wall (for now) with those photos.

IMG_8479_edited-1

Our map wall hasn’t changed. I have a few new maps, but no frames and not a huge desire to put more holes in the wall at the moment.

IMG_8480_edited-1Our office chairs were really uncomfortable and I decided I wanted something that looked a bit more interesting as well. The bookshelf has been rearranged (sadly practicality and Greg won over color coding) and houses a few new plants that haven’t died. Yet.

IMG_8483_edited-1

The pouf I made earlier in the year didn’t quite stand up to daily use. Not shocking at all, plus with it being cotton on hardwood, it collected dust bunnies like crazy. A faux leather, professionally made pouf should stand up to our wear and tear a bit more.

The one thing I am really sad to see go is the black and white striped rug. I loved that thing (and it’s relative will probably make an appearance in the nursery), but this is a very high traffic area and the white stripes were disgusting after a few months. We tried cleaning them but it just wasn’t happening. We ended up getting a rug to fill the entire room (it’s been great so far for adding warmth and Afred LOVES it) and stepped out of our comfort zone and went for the fun factor.

IMG_8482_edited-1

The last view is back to the door. It’s not all that exciting, but I love this print and wanted to make sure it made it an appearance. IMG_8481_edited-1

Really, it is. Life just keeps getting better.

The reason why this room looks clean (and it’s totally NOT because I picked up before taking these photos…) is that I took over the closet in this room and organized all my school/client and craft gear.

Untitled-2

When you first open the door, straight ahead is a small bookshelf that houses my gigantic printer and then (clockwise from top right) office supplies and paper, current sewing projects and my machine, stationary, and nutrition business paperwork. Turning to the right is the awesome new pegboard Greg installed for me. Now my sewing and knitting tools all have a home. The craft cart is not new and houses all my Project Life and other paper project goods (and needs a serious cleaning out). Not pictured, in the corner, we store our upstairs vacuum and rolls of wrapping paper.

IMG_8470_edited-1

This closet has a ton of shelving that I’ve put to good use. Top left is more Project Life stuff (yes, I need to stop buying until I use up what I have) and below that is fabric and yarn not currently being used. On the top right is the new guest linen closet and below that are supplies for my nutrition business.

We spend 75% of our time at home in this room. We are really happy it’s done and we love how it came together. Next up is the kitchen, which we’ve been working on this month. I was hoping to finish in November, but I’m still on the hunt for one more 11×14 print for the wall. And we still have a few cupboards that need to be cleaned out.

The Goods

silver frames // end table // couch // throw pillows // desk top and legs // chairs // bookshelf (similar) // turquoise cart // rug // pouf // ‘the best is yet to come’ print // california coastal counties print // space needle art // ‘seattle eats local’ map // paris city map // san francisco and seattle neighborhood maps

It took me a while to collect the new pieces as I refuse to buy anything until it’s on sale or I get a coupon for a store (unless it’s Amazon or IKEA because sales and coupons don’t happen). Typically I find what I want and then wait for the store to have a sale on end tables or rugs or whatever it is before purchasing. Sometimes it can take a little while, but more often than not within a month or two I get my item at 20% off or so. I also use Ebates for everything I buy online. 


spicy

Back in February I started a project that I left half finished until two weeks ago. I am not always great at judging how much should be on my plate. But, it’s finished and awesome and I’m even getting around to sharing it.

Back in 2010, when I first started to explore the real food movement, I discovered a love of spices. Once of the first blogs I started following was The Clothes Make the Girl and Melissa is well known for her use of spices. She has a few great posts on spices you can find here and here, which are great starting points if you are looking to include more spice in your life.

IMG_7870_edited-1

When we moved into our house I picked a spice cupboard and tossed everything in there without a lot of thought. Finding a spice typically involved several minutes of searching and often dropping at least one or two others in the process.

IMG_8371_edited-1

After a moment of serious frustrating, I went in search of a solution. Thanks to Amazon, eight months later I have an awesome spice drawer. Isn’t it pretty? The jars are 4.5 oz each with an opening wide enough for all my tablespoons.

IMG_8373_edited-1

The labels are technically chalkboard, but I highly doubt that they are reusable. I haven’t actually tried so maybe I’d be pleasantly surprised.

IMG_8376_edited-1

Along the side I’ve stored spices that don’t fit in the jars (bay leaves, red peppers) and spice mixes that I’m trying out. I like to try different blends but don’t plan to keep them on hand all the time; storing them in snack bags works better than using a jar.

IMG_8377_edited-2

My spice refills and various salts and cooking fats are now much easier to find in the old cupboard. Unfortunately though I displaced our coffee and tea collection for this project and this new layout isn’t working all that well. Instead of dropping spices while cooking dinner I now drop tea boxes in the morning. Once I find a better spot for the coffee and tea this will become bottle storage. Seriously, a baby changes everything. Apparently even kitchen storage!

the black and white blanket

IMG_8330_edited-1

Some project are labors of love but the anticipation of the finished product keeps you going. That is exactly how I felt while making this blanket. I first saw the style on Elise’s blog over a year ago. It wasn’t until after I successfully knit a blanket for a friend’s baby that I decided I could take on this one. 
IMG_8338_edited-1

It was actually quite simple once I dove in, seeing that it followed my typical rules for knitting – no patterns and only using the knit stitch. I don’t like to spend free time knitting, I prefer to keep it my TV watching, long car ride riding, and flying activity. This is only possible for me if I don’t have to pay attention to a pattern or keep track of the number of stitches I’ve done in a given style. All I had to do for this blanket was count the number of rows to make sure they were even.

I made the blanket in five long columns that I then stitched together. I’m not sure I followed the stitching together part exactly as it’s stated in the original blog post. I just found a way to make it work for me. So far it’s all held together! The columns made it portable. One problem with a blanket is that by the end, it’s huge. This blanket was easy to take with  me on our travels to work on given that I only ever had to bring a piece that was about 8 inches wide.

IMG_8335_edited-1

It’s the perfect size to curl up in and watch TV (while working on the next project, of course!). ff you cuddle closely you can fit a second person under as well. I love that if I want to expand it at some point I can do so by knitting a sixth (or seventh or eighth) column.

IMG_5995-1_edited-1

Right now, it’s about 56 inches by 38.

IMG_8337_edited-1I didn’t keep very good stats on any projects I worked on while in school. I know I used eight skeins of each yarn and I’m pretty sure I got them on sale for $2.99. I might have bought a new pair of needles for the project but I’m not positive. In terms of time, I worked on this over the course of seven months, on and off. It took pretty much forever, but was an easy project to set down and pick up again later.

Project: 8/35
Time: no clue, but it was a marathon, not a sprint
Tutorial: checkered knit blanket
Cost: ~$30.00 (16 skeins of yarn on sale and a new set of knitting needles)

fall decorating

When I learned to sew last fall I set a goal of creating 35 projects by my 35th birthday (a.k.a. 35×35). Then I took ten months to pursue schooling in nutrition and find myself having completed six sewing projects with 14.5 months to go until my 35th birthday. I’m changing my goal to be 35 craft projects. The point was to try new things and use the creative side of my brain more, so I’m okay with whatever medium that comes in. It doesn’t always have to be cotton. IMG_8316_edited-1

I knew I wouldn’t have much time for fall decorating given my school finals, but I wanted to have a little something in the house. Last year, (my favorite blogger) Elise shared a felted garland she created as part of her handmade holiday series. I decided to change up the colors and use her instructions to make a fall garland for our table.
IMG_8317_edited-1Out of convenience I went to the Joanne’s that has much less variety and had to work with the felt they had available. In the end I really love the color combo of orange, green, purple, cream, and tan. Typically I am not a big fan of purple, but it works here.

IMG_8282_edited-1This project is incredibly cheap, easy and quick. I cut the fabric during one episode of Burn Notice and put together the garlands during a second episode. I ended up having about half the felt left when I was done with my first garland. I’m not sure if I misread something or if mine is that much shorter than Elise’s. Either way, I made a second garland and sent it to my sister for her table.

Project: 7/35
Time: 2 hours for 2
Tutorial: felted Christmas garland
Cost: $6.14 for both (1/4 yard of 5 felt colors; roll of twine)

candlesticks and placemats are both from Crate&Barrel (wrinkles not included); mini pumpkins were a gift from my MIL 

the pouf

IMG_8053_edited-1

As part of my efforts to finish the office update, I made us a pouf. We don’t have a coffee table in front of the couch in order to keep the space open, but we needed something to put our feet up on.  IMG_4392_edited-2

I’m not sure what it was about this project, but I found it really tedious and it took me months to finish. I bought fabric in January, cut it in February, sewed one half in March, and then finally finished it a week ago in May. It might be that I just have a lot going on and this felt like a project that I needed to finish but didn’t care much about by the time I sat down to complete it.

IMG_8055_edited-1

I’m not sure the pouf is going to last all that long. I think I might have overstuffed it, so the seems are already pulling a bit. For now, it’s serving it’s purpose as a foot rest at the desk or when we’re on the couch. 
IMG_8061_edited-1

Project: 6/35
Time: 3 hours
Tutorial: Sewing 101: Making a Pouf
Cost: $20 (that’s a guess, bought the fabric awhile ago and don’t have the receipt)